Sunday, 31 July 2016
Thursday, 21 July 2016
Design Team project - Storybook collection

Ok, so little confession... I LOVE THIS COLLECTION!
The colours in this set just work so well together, and the theme lends itself in so many ways to a multitude of themes! This collection is one you NEED in your stash ;)

Any ways on with today's page... So I started with cutting the book shelf off of the "read " page and foam padding it on to the base of the "paperback" page.
I then cut the "if love was a storybook we'd meet on the very first page" from the "read" page...
The rest of this sheet is now used for your Iris folding heart!
If you've never seen Iris folding before, it's a really effective technique that's really easy to do and a great way to use up left overs of 12x12s
First you pick the card you wish to have your Iris folding sit behind, so for my project I used a piece of century gold card stock, embossed with a kaisercraft flourish embossing folder (£7.99)
And cut it down slightly.
Then print the image you wish to use, for mine I used this heart...

The web address on the design has loads of FREE patterns!
Cut the heart out, trace around it on the back of the card (my gold embossed bit)
Then cut it out, don't forget you don't want the heart itself you want the frame.
Place your printed heart below the gold card (gold card face down) now cut 2cm strips from the paper you wish to use (don't forget for our project we are using the "read" page) and fold them in half (length ways) with the side facing out you wish to see... Now attach them in order shown on the heart.. With the crease pointing in to the middle, to attach them I use cellotape to attach the ends of the stripes to the back of the gold card, making sure none is visible inside the heart... Carry on until you hit the last number, then the gap in the middle stick another piece of the "read" paper over this too.
Now for my Finishing touches... I've added a couple of dies to finish off the page... The first one I used was the view finder die that I cut from gold centura pearl and tucked behind the photo. Next up I used a branch and cut it from the "books" sheet, I also cut matching flower heads and rounded them... Then I stuck them on the branch cuts and foam padded these in to the page, adding gold gems to the centres of the flowers.
A little glimpse at the rest of this fantasic collection to tease you a little more...

A massive thank you to Jones Crafts for supplying me with all these fantastic pages and dies to make this page :)
All of these products are available in store at Craftmania - Great Yarmouth, Norfolk & Craftmania - Lowestoft, Suffolk - www.facebook.com/craftmaniacrafts
Thursday, 7 July 2016
Mademoiselle frame

Today's project....

This time I've been very lucky to get my hands on a Kaisercraft Mdf shelf kit and some fantastic mademoiselle papers!
Here's a little look at the collection...

So on with the project..

Firstly I covered my circle with the paper - floral spray remembering to cut my slits for the shelves.
Around the edge I've used ultra sticky double sided red tape and placed a patterned lacé over the top so it has a scalloped edge, I've also done the same with the shelves..

On top of this I have covered the shelf with a little off cut of the reverse of "flutter"
I've then cut as many full butterflies as I could from the rest of the flutter sheet and on the spare off cuts I've stamped in memento - potters clay a large clock face from the provincial set of stamps.
Then all I've done is attached my clock faces, butterflies and added a few pearls to my shelves.
On to the attached hanger... I've drawing pinned in a ribbon to both sides of the frame, then wrapped other ribbons and wires around them adding beading to the wire as I've gone to create a twisted beaded ribbon hanger, I then just glue gunned on a couple of butterflies and hey presto.... Job done!
A massive thank you to Jones Crafts for supplying me with these fantastic products to play with!
All of the goodies used for today's project are available for purchase from Craftmania - Great Yarmouth & Craftmania - Lowestoft
Thank you for viewing today's project :)

Monday, 4 July 2016
Boho dreams quick layout idea....

Today I've been having a very simple little play with the new Boho Dreams collection...

For this very quick friends layout I've picked the "feathers" - "young" - "bohemian" pages to work with,

To start, all I've done is fold the top left corner from the feathers page, and stuck it flat to the "young" page leaving the fold back area open to create a pocket, perfect for putting in movie tickets, napkins or other mementos.... I've then used elements from the "bohemian" page to cut out and decorate my page, many of these elements have faux staples printed on them, so I thought this may be a fun way to attach my elements! Quick, easy, effective!
Hope you like my quick simple page, a massive thank you to Jones Crafts for supplying me with these wonderful papers!
Saturday, 11 June 2016
Design Team Project - Mermaid Tails

Welcome to my latest project, for today's page I've used the Kaisercraft Mermaid Tails collection....

I started off with a sheet of mermaid tails dolphin and using a plate as a template I drew round it, but not over the mermaid, then cut out it, leaving the frame in tact and cutting around the edge of the mermaid so she stayed attached to the frame.
For my next layer down I used a sheet of mermaid tails coral reef, for this one I used a bowl for my template as it was slightly smaller than the plate to give me a layered effect.
I then foam padded these levels together on top of a sheet of mermaid tails ripples.
Now for the fun part... DECORATING! I kept this one a little simple, using the base bars from the three sheets to add bars across the page. I added glitter card die cuts to add a little under sea sparkle to my bushes behind the mermaid... For this I used one of my favourite IO dies -

I hope you enjoyed today's project! All of the products used today can be purchased from Craftmania Great Yarmouth (Norfolk) or Craftmania Lowestoft (Suffolk).
Thank you to the wonderful team at Jones Crafts for supplying me with these wonderful products to use for this months project :) (Jones Crafts are one of the leading crafting wholesalers stocking all of these fantastic products and many many more!)
Friday, 6 May 2016
Jones - Design Team - Always & Forever
So today I've got my hands on the gorgeous Always & Forver - Kaisercraft paper collection thanks to the wonderful team @ Jones Crafts


And that's it... A nice simple little page, once again I would like to thank the team at Jones Crafts for giving me the chance to play with this brand new collection!
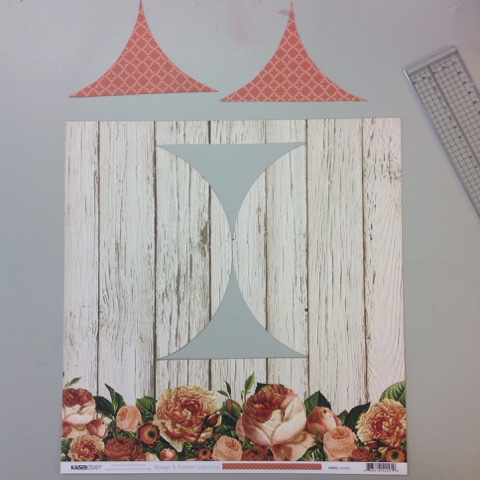
At the moment I'm going through a bit of a cutting stage... Using the most odd templates lol, today
I'm using a small plate!
So to start with find the middle of your page with a ruler and make a mark -
Take your template and draw round half of it, from both sides...
Then join the top & bottom of the circles using a ruler, and now cut along the lines to remove the two odd shaped triangles...
Now fold the half moons back to reveal a window... I used a little lacé to decorate the edges of my fold backs, just attached with a glue gun.
I've used a sheet of always & forever - love for my backing of the window (reverse of the sheet) and all of my text emblellishments come from the front of this sheet.
Besides this I've added a few pearls and some corners to set my page off... The corners I've created are super easy! (Especially if you like teabag folding!)
Step one - cut 4 squares - mine are 2-1/2"
Fold diagonally in both directions -
Then open out and corner punch (this is much easier then corner punching than trying to line up to fold diagonally).
Next up, fold them in half posting two sides in towards the middle....
Open out and cut in half...
Now you have two corners to glue on, folding the sides around the back of the page, so it looks like a fancy photo corner of sorts...
And that's it... A nice simple little page, once again I would like to thank the team at Jones Crafts for giving me the chance to play with this brand new collection!
All of the papers from this collection are now in stock @ Craftmania - Great Yarmouth (Norfolk) & Craftmania Lowestoft (Suffolk)
Monday, 18 April 2016
Round card - Kaiser Craft - Fairy Dust
So one of my favourite pastimes is coming up with new ideas for apature cards... It's lead me to create many a random creation... Well for today's project it hit me you don't often see a round card! The reason for this may well be its a bit of a beast to construct... And is more a boxcard than just a card... But having been brought up with a mother who is dollhouse obsessed, mini scenes have always been part of my world, so the two sort of come together to create this.... 


I cut a 1/2" strip from a sheet of - flutterby - and stuck around the inside edge of the cylinder at the top, then cut the scalloped circle text from the fairy wishes sheet and glued in to the top of the box.
So to create my round card is very easy.....
Take a standard 3 fold - A5 rectangle apature card and cut all 3 panels in to single pieces....
Now take one full panel (place backing paper of choice on the part that will be on the inside of your box on top of this panel) and the apature panel (attach acetate to the inside) and stick them together just on the edges to create a cylinder..
Now the final panel, cut in half width ways to create the doors!
Simply stick these over the same seam as where your cylinder joins are... Hey presto one card box of sorts.....
Hope you're all still following ;)
Now to fill your cylinder... I used a ribbon reel for my template here, but I'm sure you could find a die the right size. Cut 3 circles, and cover one with paper to use as the base of your inside scene, I used Kaiser craft - Fairy Dust - dew drops.
For my pop up centre I've used the butterfly oval from the Fairy Wishes page, I cut the wings on the butterflies so they folded up to look a little more dimensional, and glitter glued the "Magical" with an irridescent sparkle.
The stand up fairy comes from the same sheet, I just cut her out and glued her to a cocktail stick, before poking it through butterfly oval (It will sit on the base to keep her standing upright).
I then created a triangle stand for the butterfly oval, so it sat diagonally in the box, I took a 5-1/2" strip of card and scored it 2"- 1"- 2"- 1/2" gluing the the 1/2" to the first 2" panel to great my stand.
Now to pop our completed base unit in place, take 6 pieces of card 1"X 1/2" and fold in half to make brackets - glue gun these to the base of the scene insert, then glue the brackets to the inside of the cylinder so the scene appears in the window.
On the back panel of the scene I added another fairy from the fairy wishes sheet, and a couple of butterflies for added depth.
Now with your second circle, create another 6 brackets and glue these on to the circle and glue in upside down to create a flush roof to your scene, repeat this with the third disc put up the right way in the top of the cylinder so you have a nice top, slightly set inside the cylinder that can now be decorated....
On the inside of the doors I've attached two panels of flutterby.
To finish my project I added peel off borders around the window and glued double stacked ribbons around the box to tie in to a bow to close the doors... With an added tag from the fairy wishes sheet, and gems around the top rim of the box.
And that completes my project for today!! I hope this all makes sense! Any questions, please don't hesitate to ask :)
Subscribe to:
Posts (Atom)